Jenkins
Contents
Introduction to Jenkins
Jenkins is a Continuous Integration (CI) server written in Java. With CI it is possible to run tests on a server computer automaticcally everytime when someone commits new code into the repository. Because of this, there is always a fast feedback of the tests. This is important, because by this way it is simple to see when the build exactly is broken. There are hunderds of plug-ins that can be installed to set up the build to your wish.
We choose for Jenkins because it is simple to use and the variety of the configuration that is possible with Jenkins.
Installation
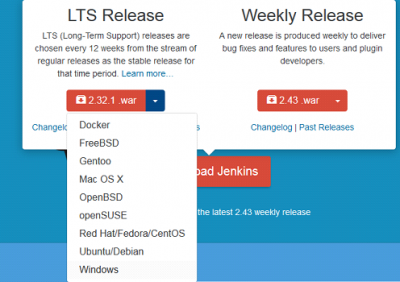
In order to install Jenkins, first the executable will need to be downloaded from the site of Jenkins
Press the "download" button. A pop-up menu will appear. From the menu select "LTS Release" (2.73.1) and click on the arrow, select "Windows".
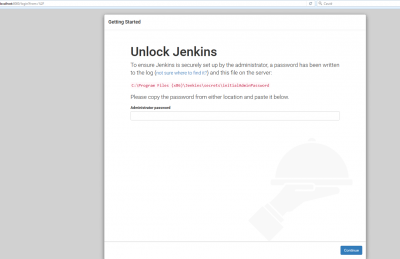
Then unzip the file that where downloaded and then click the executable. The installation process is going to start. Then follow the installation wizard. Choose the path where you want to install Jenkins. After the installation is over, open the webbrowser and type localhost:8080. It will direct to page as shown on the picture below.
Here will be asked to enter the password located in the "C:\Program Files (x86)\Jenkins\secrets\initialAdminPassword" (this is an example).
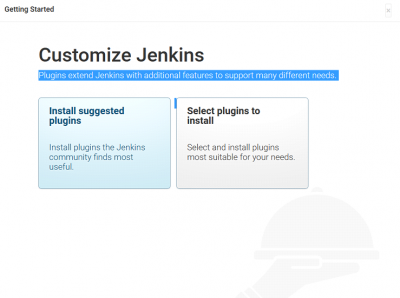
Once finded the password, copy and paste it under "Administrator password". Then press "continue". After this press "install suggested plugins".
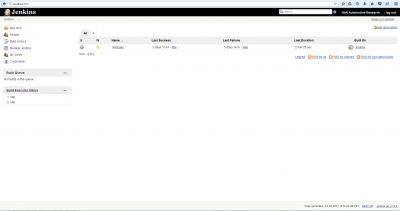
After the suggested plugins are installed a window will appear where the "username", the "password", "full name", and "email address" must be set. After all this information was filled in click "Save and finish". The next window that will appear, press "Start using Jenkins". After this the Jenkins Dashboard will appear and will be similar with the picture below.
Configuration
Manage Plugins
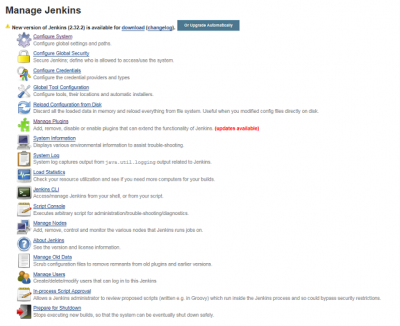
After this, "Manage Jenkins" needs to be clicked. A menu will show up and is going to look like the picture below.
From the list the button "Manage Plugins" needs to be selected. The following plugins will need to be installed:
- Locale Plugin
- Multijob Plugin (in case of distributed builds performed by slave machines)
- Shared Workspace
- TestComplete support plug-in
- SonarQube Scanner support for Jenkins
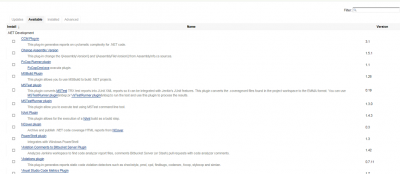
In order to install the plugins from the menu (see picture below) the button "Available" needs to be selected.
After Available was selected, type in the search box the name of the plugin that is desired by the user to be installed. In this case for example the MultijobPlugin. After the name of the plugin is typed the menu will look like the picture below.
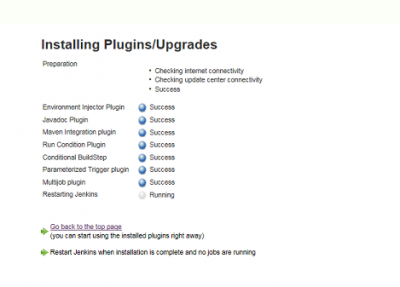
The box needs to be clicked and then ‘Install without restart’ needs to be pressed. Then there will appear another menu for example like the picture below.
The option restart “Jenkins when…” will need to be selected. Then the same procedure will need to be repeated for all the plugins listed in the list above. In case it doesn’t restart automatically a refresh of the page is necessary.
After the plugins are installed the following programs will need to be installed on the PC (or remote machines when a distributed build is used):
- Apache Ant 1.9.7
- TestExecute 12
- SonarQube 5.6.6
- SonarQube Scanner 3.0.3.778
How to install Apache Ant 1.9.7?
In order to install Apache-ant-1.9.7 go to this page.
How to install TestExecute 12?
In order to install TestExecute 12 go to this page.
How to install SonarQube 5.6.6?
In order to install SonarQube 5.6.6 go to this page.
How to install SonarQube Scanner 3.0.3.778?
In order to install SonarQube Scanner 3.0.3.778 go to this page.
Global Tool Configuration
After Apache Ant, SonarQube and SonarQube Scanner are installed, the next step is to configure Jenkins further.
Now ANT, JDK and Sonarqube need to be configured in Jenkins.
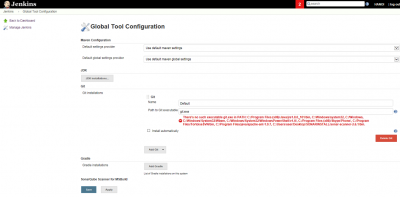
In order to do this, first the button "Manage Jenkins" in the Jenkins homepage must be pressed, then "Global Tool Configuration" must be clicked. Once the button "Global Tool Configuration" was clicked there will appear a menu that will look like the picture below.
The button JDK installations needs to be clicked. Then there will appear a menu that will look like the picture below.
In the "Name" cassette, the name of the JDK must be specified , an example can be seen in the picture above. Then in the cassette of "JAVA_HOME" must be specified the destination of the JDK.
In order to install SonarQube Scanner the button "SonarQube Scanner installations" must be pressed. After the button is pressed there is going to appear a screen something similar with the picture below.
The same procedure like in the case of the installation of the JDK must be applied for SonarQube Scanner. In the "Name" box must be typed the name of the SonarQube Scanner. In the "SONAR_RUNNER_HOME" must be typed the specified path of the SonarQube Scanner. An example can be seen in the above picture.
In order to install ANT the same procedure like in the case of JDK and SonarQube Scanner must be applied. Fill in the name of the Apache Ant version in "Name". In "Ant_Home" must the path be specified.
An example of how ANT needs to be installed in Jenkins can be seen in the picture above. Click on "Save" and go further to "Configure System"
Configure System
After the programs are installed the next step is to Configure Jenkins. The "Configure System" menu can be accessed using the following steps: click on "Manage Jenkins", then click "Configure system". The menu that will appear will look like the picture below.
Then the next step SonarQube server needs to be configured. In order to do this, where "SonarQube servers" is written, the button "add SonarQube" needs to be clicked. In the "Name" cassette the name of the SonarQube token needs to be filled. After the name was filled in, the "Server URL" of the SonarQube server must be specified. An example can be seen in the picture below.
To fill in the "Server authentication token", the token must be made in the SonarQube server. See the SonarQube page for creating a token.
Then te location of jenkins must be specified, an example is shown below.
The next step is to set up the Workspace Sharing. The "Name" can be anyone the user desires. For "Repository URL" the repository URL must be filled in. An example can be seen in the picture below.
The last thing that it needs to be set is the "E-mail Notification".
Example in case the user has google mail:
SMTP server: smtp.gmail.com
Default user e-mail suffix: @gmail.com
See picture below for the configuration of the e-mail.
Then click on advanced and then the "Use SMTP Authentification" needs to be selected. The "user name" and "password" of the google account need to be provided, after this "Use SSL" needs to be clicked. Then the SMTP port is 465. This is all the information that needs to be filled in order to configure the E-mail plugin. See picture below.
After everything was set the user needs to click "Save".
Configure a job in Jenkins
In order to cofigure a job the following steps must be followed. In the frontpage of jenkins "New Item" must be selected to create a new job.
There will be a field to type in the name of a job. Here it is also possible to chose the sort of project, HANtune uses Freestyle project. And then click on "Ok".
Now the project can be configured.
In "Source Code Management" click on "Subversion" and now add the "Repository URL". Then the credentials can be added by clicking on "add". After that the "Local module directory" can be filled in as desired. An example of the configuration of the "Subversion" can seen in the picture below.
After that, in "BuildTriggers" Jenkins can be set to build the project whenever desired. In the picture below there is an example of a periodical build. If the schedule is not onderstood, click on the question mark.
In "Build Environment" click on "With Ant" and set the cassette "Ant Version" to the version that is installed on the PC. An example of this is shown on the picture below.
The next step is to set up the Build. In "Build", click on "Add build step" and choose "Execute SonarQube Scanner". Then in the cassette "JDK", type in the verion of the JDK that is installed on the PC. In the cassette "Analysis properties", the following #'s must be removed to execute SonarQube Scanner:
- sonar.sources
- sonar.tests
- sonar.java.binaries
- sonar.java.libraries
The picture below shows an example of the path's that are filled in.
After that the next build steps are added, like "Execute SonarQube Scanner" and "Invoke Ant" et cetera. So click on "Add build step" and choose "Invoke Ant". In the cassette "Ant Version" choose "Default". In the cassette "Targets" type in build. An example of this is shown on the picture below.
The same step is repeated for the build step "TestComplete Test". Click on "Add build step" and choose "TestComplete Test". In the cassette "Project suite file", type the path of the project suite of TestComplete test. Then you can choose the level of the building step, for example choose "Entire suite". The picture below shows the build step "TestComplete Test".
After that the settings of the "TestComplete Test" must be configured. Click on "Advanced" under the "TestComplete Test". In the cassette "Test Runner" chose "Any". In the cassette "version" chose "Latest". In the cassette "Action on warnings chose "None". And in the cassette "Ation on errors" chose "Mark as UNSTABLE". After that chose "Run interactive user session (TestComplete/TestExecute 10.6 or later is required)". Set up the next cassettes: "User" and "Password" of the PC. In the picture below is shown the settings of the build step "TestComplete Test".
Click on "Save" and now the configuration of Jenkins is done.


